- What is MetaMask?
- Is MetaMask Compatible with USDT?
- Why Would you Want to Add USDT to MetaMask?
- How to Add USDT to MetaMask: 5 Key Steps
- How to Find the Correct USDT Contract Address
- Tips and Troubleshooting When Adding USDT to MetaMask
- Tips for Using USDT Safely on MetaMask
- Frequently Asked Questions on How to Add USDT to MetaMask
Trying to add USDT to MetaMask?
You’ve come to the right place.
One thing you can expect from the Web3 world is innovation and novel concepts, and because this is new to everyone involved, especially the users, you’ll find yourself looking for guides like this to navigate through.
One such innovation is MetaMask. It is a relatively new addition to the Web3 ecosystem that provides an easy and secure way to manage digital assets.
USDT, on the other hand, is one of the largest stablecoins by market capitalisation.
It is a non-volatile crypto coin tied directly to the US dollar and is one of the most popular coins people use on the MetaMask.
In this guide, we’ll discuss in full detail how to add USDT to MetaMask, but first, let’s get a deeper understanding of this innovation.
What is MetaMask?
MetaMask is a crypto non-custodial wallet that allows you to store and manage your Ethereum private keys, and, consequently, interact with decentralised applications and other blockchain services.
MetaMask is a key player in the Ethereum ecosystem as it is a digital wallet you can use for the storage of Ether and tokens built on the Ethereum blockchain, like USDT.
Another key feature that makes it popular is that it is available as a browser extension on most web browsers like Chrome, Firefox, etc. So, it provides easy access to the web.
Top Pick:
- USDT TRC20 Contract Address: What is it & How to Get it?
Is MetaMask Compatible with USDT?
Yes, MetaMask is compatible with USDT (Tether), but only on blockchains that it supports.
MetaMask can store and transfer USDT on Ethereum (as an ERC-20 token) and Binance Smart Chain (as a BEP-20 token).
To use USDT on Ethereum, simply ensure MetaMask is connected to the Ethereum Mainnet. Thereafter, add USDT manually using the official ERC-20 contract address from Tether’s site or Etherscan.
MetaMask also supports Binance Smart Chain, a popular Ethereum-compatible network.
To use BEP-20 USDT, first add BSC as a custom network in MetaMask since the wallet doesn’t include BSC by default.
After this, switch to the BSC network and add USDT using the correct BEP-20 contract address found on BscScan or other trusted explorers.
While USDT also exists on the Tron network (TRC-20), MetaMask does not support Tron natively.
However, advanced users can attempt to interact with Tron via custom RPCs or third-party bridges, but this is not officially supported by MetaMask and can be risky. To manage TRC-20 USDT, it’s safer to use Tron-native wallets like TronLink.
Notably, it’s critical to choose the right blockchain network in MetaMask as sending USDT to the wrong network can lead to permanent loss of funds. Additionally, fees and transaction speeds vary between networks.
Ethereum has higher fees, while BSC is generally faster and cheaper.
Related:
- ERC20 Wallet Address: What is it & How to Get One?
Why Would you Want to Add USDT to MetaMask?

There are a couple of reasons people always want to add USDT to MetaMask, chief of which is, USDT is a global cryptocurrency.
USDT is widely accepted by many exchanges and blockchain services, so adding it to your MetaMask wallet gives you the freedom to move it around as you like.
It gives you access to many Web3 services like DeFi applications, maximum utilisation of DApps, and interaction with other decentralised exchanges (DEXs).
How to Add USDT to MetaMask: 5 Key Steps
1. Install and set up MetaMask.
Download your MetaMask extension or mobile application, then connect it to the Ethereum Mainnet. This is the default network for all MetaMask wallets; however, you can connect to other networks like Binance Smart Chain, Polygon, Avalanche, etc.
But, you must ensure you’re connected to Ethereum Mainnet before making any switch-ups.
2. Navigate to the Tokens tab
Next, you make your way to the “Tokens” tab on the main dashboard. You’ll find this at the bottom of the screen.
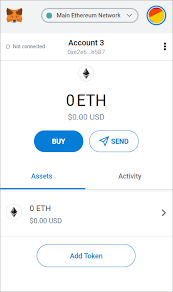
3. Add a custom token
Upon opening the Tokens tab, you’ll find a list of all the tokens on the MetaMask. Then, you select USDT. In the case where you don’t find it, you can enter it manually by entering the contract address, symbol (USDT), and decimals.

However, if you select USDT from the list, a form will open up.
4. Input the USDT contract address
In this form, you’ll be required to fill in the contract address. The other field for the symbol (USDT) will automatically get filled.
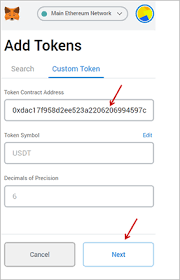
5. Confirm and complete the process
After filling these fields, go over them once again to ensure that all fields are correct. Then click on the “Next” button to complete the process. Now, to add USDT to MetaMask, the platform will ask for confirmation to add USDT to your wallet.

Agree to this, and congratulations! you’ve successfully added USDT to MetaMask
How to Find the Correct USDT Contract Address
Now since you’ve learned how to add uSDT on MetaMask, to safely use it, it’s important to add the correct contract address for the specific blockchain you’re using.
Entering the wrong address can lead to interacting with fake or scam tokens.
Therefore, always rely on trusted sources to ensure you’re adding the legitimate token for the right blockchain.
You can start with CoinMarketCap or CoinGecko, two reputable crypto data sites. Search for “USDT” or “Tether” and scroll to the “Contracts” section.
There, you’ll find USDT contract addresses listed by blockchain (Ethereum, BNB Smart Chain, etc.). Always double-check that you’re selecting the correct chain.
You can also visit the official Tether website.
In the “Tokens” section, Tether lists verified USDT contracts across supported networks. This is a reliable and direct source from the issuer itself.
Another safe method is using blockchain explorers.
For Ethereum, go to etherscan.io and search for “Tether USD.” Look for the blue checkmark and ensure it’s a verified contract. For BSC, use bscscan.com and follow the same process.
Avoid copying addresses from random blogs, YouTube videos, or social media posts, as many scams exist. Because using an incorrect contract can lead to the loss of your funds, always verify the source and match the token to the right network before adding it to MetaMask.
Don’t Miss:
- BEP20 Wallet: What is it & How to Create One?
Tips and Troubleshooting When Adding USDT to MetaMask
Tips:
- Ensure you’re filling in the accurate contract address for USDT, so make sure you have that right. If you’re adding USDT to MetaMask on a different blockchain like Polygon, input the contract address for USDT on that blockchain.Reliable sites like CoinGecko and CoinMarketCap can provide you with contract addresses for different blockchains.
- Take extra care when adding custom tokens to MetaMask. There have been incidences where fraudsters create fake tokens bearing close resemblance to popular tokens. So, ensure you add the correct token by verifying the contract address.
- Before you add USDT to MetaMask, ensure that your gas fee can be covered with the ETH balance you have.
Troubleshooting:
1. If you run into any problems when trying to add USDT to MetaMask, the first step is to ensure you’re using the latest version of the MetaMask.
2. And if you’re still having the same trouble, you should clear your MetaMask cache and cookies.
3. If the trouble persists, try using a different browser.
Tips for Using USDT Safely on MetaMask

- Always verify the network: Sending USDT on the wrong blockchain (e.g., sending BEP-20 to an ERC-20 wallet) can cause permanent loss.
- Double-check the Contract Address: Copy only from trusted sources like CoinMarketCap, CoinGecko or official token pages.
- Beware of phishing links: Fake MetaMask sites or pop-ups can steal your private keys. Only download MetaMask from the official site:
- Use hardware wallets for extra security: For large amounts of USDT or long-term holding, connect your MetaMask to a hardware wallet like Ledger or Trezor.
- Back up your MetaMask seed phrase offline: Write it down and store it somewhere safe. Never share it online.
For You:
- How to Add USDT TRC20 to Trust Wallet in Minutes
Frequently Asked Questions on How to Add USDT to MetaMask
Does MetaMask support USDT TRC20?
MetaMask does not support Tron natively. However, users can attempt to interact with Tron via custom RPCs or third-party bridges, but this is not officially supported by MetaMask and can be risky. To manage TRC-20 USDT, it’s safer to use Tron-native wallets.
How to receive USDT on MetaMask?
Copy your MetaMask wallet address. Share it with the sender or use it for withdrawals while ensuring the sending network matches the one on MetaMask.
How to send USDT to Metamask from Binance?
Copy your MetaMask address and go to your Binance account. Select USDT, paste your address, and choose the correct network (ERC20, BEP20, etc). Confirm and send, ensuring that the network matches on both ends.
Why is my USDT not showing up on MetaMask?
You may be on the wrong network or have not added the token manually. Check the selected network and ensure you’ve added USDT using the correct contract address.
Is it safe to store USDT on MetaMask?
Yes, MetaMask is secure if used correctly. Make sure you never share your private keys or seed phrase, and consider connecting it to a hardware wallet for added security.
Conclusion
Using USDT on the MetaMask is a gateway to many other Web3 innovations on the blockchain. To get a well-rounded experience and dive deeply into the new internet (Web3), adding USDT to MetaMask is the start of an exciting journey ahead.
Stay safe as you try your hands on this exciting wallet!